Friday, December 31, 2010

Shelf with fabric background {thrift store project}

I love the idea of taking something old and bringing new life to it.  My sister and I hit the thrift stores yesterday in search for some good finds that we could spruce up!  I took an inexpensive shelf and turned it into a piece of art with a little bit of fabric and some mod podge.


I found this shelf for $2.99 and I had to pick it up.  I knew that I could turn this into a piece of artwork. 
Want to know how to do this yourself.  It's very easy!

What you'll need:
  • Thrift store find shelf
  • Mod Podge
  • Fabric scraps
  • Scissors or Rotary cutter
  • paintbrush
1)  Cut scraps of fabric to the size of each of the spaces of the shelf using the scissors or rotary cutter.
2)  Using your paint brush put a layer of Mod Podge onto the shelf
3)  Lay fabric onto the Mod Podge
4)  Put another layer of Mod Podge on top of the fabric

5)  Let dry 

Voila! You have an inexpensive and unique piece of artwork!

Wednesday, December 29, 2010

Another stamp - little bird

So, I may become addicted to making stamps.  It's so easy and pretty fun.  Here's a little bird stamp taht I made last night!


If you want to know how to make these yourself make sure to see my tutorial.

Tuesday, December 28, 2010

Make your own stamps

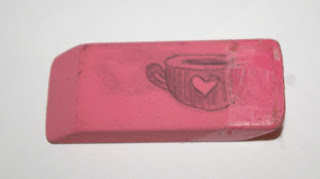
I love stamps, but hate spending so much money on them.  And also wish I could customize them.  I decided to try out making my own stamp.  Plus I think it would be great to be able to stamp my own patterns onto fabric.  Below is my first attempt at stamp making.
What you'll need:
  • Rubber eraser
  • Pencil
  • Wood carving tool
  • scissors
1)  Draw your pattern onto your eraser making sure the parts that you want to show up are colored in with pencil and those you don't want to show up on your stamp are left blank.


2) Using your wood carving tool, start carving out any of the parts that are not colored in with pencil.


3)  When you have finished carving out all of the pieces that are not colored in with pencil, then carve around the outside edge of your design.  Then using your scissor cut around your design and you're ready to stamp!


I think this turned out pretty successful and I will post all the stamps I make here!  I would love to see how yours turn out!

Saturday, December 25, 2010

Wednesday, December 22, 2010

I love owls ornament!

I love owls!  So when I saw the owl ornament banner over at West Elm I got excited, but they didn't have the ornament for sale.  It looked easy enough to make so I decided to make it myself.


I just took 1 inch strips of cardstock and ran it through my paper crimper that I got at the dollar store a few years back.  Then started rolling them up and gluing along the way with my glue gun to make the eyes and belly.  I glued in some black beads for the eyes.  Then I added a few wing feathers, some eyebrows, and a beak.  And voila my very own West Elm inspired owl ornament!

Handmade for the Holidays - Peppermint Soap

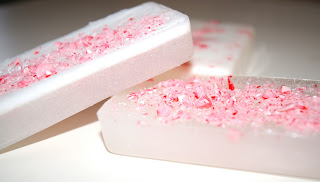
I needed something to go with my peppermint lip balm in gifts this year.  So decided what better to go with peppermint lip balm than peppermint soap!  And this one is even easier to make than the lip balm.
What you'll need:
  • Soap molds (or I've seen people use like a loaf pan and then just slice it afterward if they are making big batches, but I just needed a few so a soap mold works for me)
  • Candy Cane
  • Peppermint Extract
  • Pyrex mixing bowl (or any other bowl that is microwave safe)
  • Heat and pour soap mix (I used a goats milk soap base and a shea butter soap base, I've also used a plain glycerin base before.  Found these all at hobby lobby)
1)  Put your candy cane in a plastic bag and crush it
2)  Cut your soap base up into small chunks and place in your mixing bowl (I used about a quarter of the package of soap base for 3 bars)
3)  Put in microwave and heat in 30 second intervals until soap is completely melted
4)  Stir in about a teaspoon of peppermint extract
5)  Sprinkle a pinch of the candy cane dust into the bottom of the mold and then pour in the soap
6)  Sprinkle another pinch of the candy cane dust onto the top of the soap

7)  Place in refrigerator for about an hour to solidify
8)  After it has fully solidified you can pop them out and you have your homemade peppermint soap


(For the layered effect on the bar of soap below I filled the mold about 3/4 up with a clear Shea Butter soap base, then when it started to harden put a layer of goats milk soap base on top)

Tuesday, December 21, 2010

Stylish Blogger Award

I was reading a comment left by Esther at ShoreGirl's Creations and noticed she had nominated me for the Stylish blogger Award!  Thanks so much to Esther, everyone make sure to go check out her site here.
There are 4 duties to perform to accept this award:
1.  Thank and link back to the person who awarded you this award
2.  Share 7 things about yourself
3.  Award 15 recently discovered great bloggers
4.  Contact these bloggers and tell them about the award!

So, seven things about myself...this will be hard!
1) I'm a huge, HUGE animal lover.  I'm that annoying person that stops you when you're walking your dog to pet it.  Yep, that's me!
2) I'm an antsy person, that is actually what got me started crafting.  I couldn't sit still in college while watching movies or studying so I started crocheting to keep my hands busy.
3)  I love sea life!  Whenever my husband and I go on a trip to a place that has an aquarium we have to go!
4)  I am addicted to sugar free vanilla soy lattes...thanks Jesii and Ally!
5)  I have a degree in math...yep I'm a giant nerd!  But am currently not using my degree, unless you count sewing with an 1/8 of an inch seam allowance doing math. ;)
6)  I love spicy food!  If my nose isn't running, it's not spicy enough!
7)  My favorite thing in life is randomness.  I love when someone just blurts out some random thought that has nothing to do with what was going on.


The 15 amazing bloggers I have recently discovered are:
1) Vintage Pollyanna
2) 504 Main
3) Crazy Domestic
4) Momnivore's Dilemma
5) Sew Chatty
6) Whipperberry
7) Today's Top Twenty
8) Ziggy Crafts
9) Beyond the Fringe Crafts
10) Make It and Love It
11) Polly Wanta Crafter
12) Shrimp Salad Circus
13) Vintage Wanna Bee
14)  Bouffe e Bambini
15) Centsational Girl

Alright I'm off to go let these amazing bloggers know that I have given them this award.  Everyone make sure to go visit Shore Girl's page and the 15 other amazing bloggers!

Monday, December 20, 2010

Christmas Cat Toy!

I did a toy for my puppy so I had to make one for my kitties too!  Here's Gizmo with his new catnip mouse!
What you'll need:
  • Two pieces of fabric cut into a mouse shape (see picture further down)
  • Sewing machine
  • Embroidery floss
  • Needle
  • Two inches of coordinating ribbon or string (for the tail)
  • Stuffing
  • Catnip
1)  Cut out your fabric into the mouse shape.
2)  Using your embroidery floss and needle embroider the initial of your cat's name.  In this case it was for Gizmo so he got a G.
3)  Put your piece of fabric with the initial right side up.  Place your ribbon where the tail should go (like in picture below).  Place your other piece of fabric on top of this.
4)  Sew around the edge of this with an eighth of an inch seam allowance, leaving a one inch hole at the bottom of the mouse.
5)  Turn mouse right side out.
6)  Fill with stuffing and catnip.
7)  Sew your opening shut.  I just used my machine, but you could sew this part by hand.

You've got a quick and easy cat toy!
Parties I'm linking to:  Today's Creative BlogMade with love Monday

Puppy Toy!

I asked my friend Ally what I should make next and she told me "Don't forget about your pets this holiday season!"  So I decided to make a new toy for my puppy Chester!


As you can tell by the look on his face he was pretty stoked to get a new toy!  He loves it and it is super easy to make!

What you'll need:

  • First and foremost, an adorable puppy who is need of a new toy!
  • Two pieces of fabric cut to a bone shape (choose whatever size will work best for your dog's size)
  • Two pieces of fusible interfacing cut to a bone shape
  • Iron
  • Sewing machine
  • Needle and Thread
  • Stuffing


1)  Following the instructions on the fusible interfacing, iron it onto the wrong sides of your fabric (I just used yellow fabric so there wasn't a wrong side).
2) Now sew the two pieces of fabric together wrong sides together with a quarter inch seam allowance, leaving a two inch opening (for turning).
3)  Turn your bone right side out.

4)  Stuff your bone with your stuffing (I used poly-fil).


5)  Using your needle and thread close up the opening.  I just used a slip stitch, but you can use whatever you like!

Sorry, I didn't get any great pictures of the bone before Chester decided he NEEDED to play with it!  I guess he doesn't have to wait until Christmas to get his toy!

Aww, isn't he so handsome?!
What crafts are you making for your animals this Christmas?  I would love to hear about them!

Saturday, December 18, 2010

DIY Card Wallet Tutorial

I was wanting a small little wallet that I could easily put my drivers license and card in and put in my pocket without having to carry around a big purse all the time, and so decided to make one, or two...and will probably make more.  Below is my tutorial on how to make these yourself!

What you'll need:
  • Fabric cut to 8"by5" (you'll need one piece of outer fabric, one piece of inner fabric and one piece of fusible interfacing
  • Fabric cut to 2.5" by 4" (you'll need two pieces outer fabric, two pieces inner fabric and two pieces of fusible interfacing)
  • Iron
  • Button
  • 2 inch piece of stretch cord
  • Fabric rosette (optional, see my DIY Rosette Hair Pin tutorial on how to make these)
  • Glue gun if you choose to add a rosette
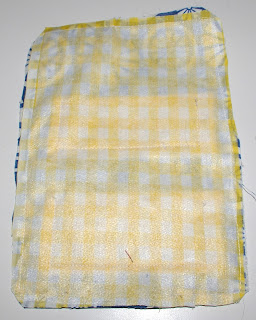
1)Following the instructions for your fusible interfacing, iron your interfacing onto the front colors of fabric.  For the purposes of my tutorial, this is the blue fabric.
2) Sew together two of the small pieces of fabric, right sides together on three sides (the two long sides and one short side).  Do the same for the other two small pieces of fabric.
3) Clip the corners and turn right side out.
4)  Press with an iron, ensuring to fold in the open seam.

5)  Sew the small pieces of fabric onto the inside piece of fabric.  I got out a couple of credit cards to find where I should place the two pockets.

6) On the outer piece of fabric sew a button about two and a half inches from the bottom of the fabric.  I usually eyeball this.
7)  Now place the two big pieces of fabric right sides together.  At the top of the fabric sandwich place the stretch cord with the loop going inward so when you turn right side out it will be on the outside.  Sew an eighth of an inch around the edge, leaving a two inch hole at the bottom (I usually sew a couple times over the spot where you are sewing over the stretch cord).  Clip the corners.

8)  Turn right side out and press, ensuring fabric is folded in at the open seam.
9)  Sew an eighth of an inch around the entire outside of the wallet.
10) If you want to add a rosette now is the time to hot glue it to you wallet, you can either add it directly to the fabric or glue it on top of your button.  I iron mine again at this point just to get out any wrinkles and to press down where the folds are.  And you're done!


I hope you find this tutorial useful.  As always, I would love to find out how your project turns out!

Parties I'm linking to:
DIY Living Party
Blue Cricket Design
Tickled Pink
Sundae Scoop
Talent Tuesdays
Crazy Domestic
Sunday Showcase
Creative Juice Thursday
Saturday Soiree
It's a Hodgepodge Friday
Show and Share Day
Saturday is Crafty Day
Polly Want a Crafter
Let's Sew
Motivate me Monday
Made by you Mondays


Wednesday, December 15, 2010

Handmade for the Holidays - Christmas Coasters

Making your own fabric coasters is an easy and inexpensive gift idea.
What you'll need:
  • 4.5" x 4.5" pieces of fabric (4 each of front fabric, back fabric, and felt for the inside)
  • Sewing Machine
  • Scissors
  • Iron


1) First make a sandwich out of your fabric (right sides together) and then place one of the pieces of felt on top.  Stitch around the fabric sandwich but leave a two inch gap on one side
 
2) Cut the corners off diagonally (see below)

3) Turn right side out so that the felt will be in the center.  Fold in the fabric on gap and iron flat

4) Start sewing along the edges (starting with the side with the opening) 1/4 inch away from the edge. Sew around all four sides, on the last side stop 1/4 inch away from where you began sewing and turn, sew until you are 1/4 inch from the next seam and turn, continue doing this until you are to the center of your coaster.
5)  Once you have reached close to the center sew one of your seams so that it meets the next (see the center of my picture below.  You're done, clip any loose ends of threads and you've got your coaster!
Here's the front of my finished project:

Monday, December 13, 2010

DIY Rosette Hair Pins

I've been seeing rosettes all over the place lately and love them!  So decided to make some of my own and will show you how to do it too!  It's extremely easy and a good way to use up your fabric scraps.
What you'll need:


  • Bobby pins-I got some from a craft store that are more flat than normal bobby pins, but don't see why you could use regular bobby pins
  • 1" by 12" piece scrap of fabric (smaller if you want smaller rosettes)
  • Glue Gun
  • Scissor
1)  Fold your piece of fabric in half so that the one inch edge will be a half inch and glue with glue gun (just one end of the fabric)

2) Fold your piece of fabric in half again and glue (will be a quarter of an inch wide)
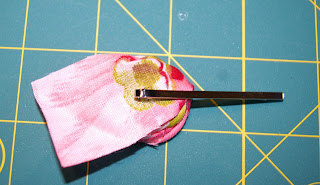
3) Twist a few inches of your fabric up.  Use the quarter inch end as a small base, but a dab of glue there and start wrapping your twirled fabric in a circle (like in the picture below)
4)  Keep twirling and wrapping around the circle making sure to secure with a dab of hot glue every 1/4-1/3 of the way around the circle

5) When you get toward the end leave about an inch of fabric and glue it underneath the rosette


6) Next put a dab of glue on the back of your rosette and place your bobby pin in the glue


7) Clip the tail off of your rosette with your scissors

And you're done!  Make as many as you want in coordinating colors and wear them yourself or give them as gifts.
 
Linking to: