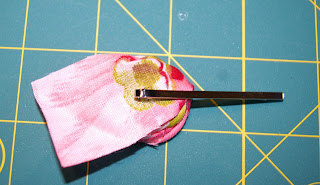
What you'll need:
- Bobby pins-I got some from a craft store that are more flat than normal bobby pins, but don't see why you could use regular bobby pins
- 1" by 12" piece scrap of fabric (smaller if you want smaller rosettes)
- Glue Gun
- Scissor
2) Fold your piece of fabric in half again and glue (will be a quarter of an inch wide)
3) Twist a few inches of your fabric up. Use the quarter inch end as a small base, but a dab of glue there and start wrapping your twirled fabric in a circle (like in the picture below)
4) Keep twirling and wrapping around the circle making sure to secure with a dab of hot glue every 1/4-1/3 of the way around the circle
5) When you get toward the end leave about an inch of fabric and glue it underneath the rosette
6) Next put a dab of glue on the back of your rosette and place your bobby pin in the glue
7) Clip the tail off of your rosette with your scissors
And you're done! Make as many as you want in coordinating colors and wear them yourself or give them as gifts.

Linking to:


Katie... I want to make these! So CUTE! Hopefully I get one in my stocking?!?! You're awesome and so talented.
ReplyDeleteLove ya,
Big Sis
I had planned on making some for your stocking already...but you have to act surprised when you see them!
ReplyDeleteThese are so adorable, Katie! And so easy to make. Thanks for sharing your tutorial on them! I am now following you thanks to Making Friends Monday and it would be so nice if you could share the love back on my blog:)
ReplyDeleteOh and don't forget to stop by today and check out our easy steps to become a successful blog! See you there! Happy Tuesday:)
very cute, thanks! :)
ReplyDeleteI'm now following back from TBH:-) Love your crafty blog and this tutorial too!
ReplyDeleteThis is wonderful! I have been looking for a tutorial for these for a long time!
ReplyDeletecheck out my blog
http://thestewartestate.blogspot.com
How pretty! Great tutorial too!
ReplyDeleteI think I'll make a few for Christmas gifts myself -- have a few little jean pocket purses that need some filler!
these are so cute. very simple/crafty.
ReplyDeletethank you for stopping by my blog. I am following back
http://www.bassgiraffe.com
I'm blog hopping today and thought I would stop by your blog. Hope you will visit either or both of my blogs and say hello and follow (if you aren't already a follower).
ReplyDeleteJessicas Lil Corner is my family blog at http://jessicaslilcorner.blogspot.com
So Stylilized is where I am currently offering FREE custom blog designs at http://sostylilized.blogspot.com
Have a VERY VERY blessed Tuesday!! :0)
These are great. So romantic and fun. Thanks for sharing!
ReplyDeleteThanks for joining in the TTT Tuesday Blog Hop Fun! I now Follow you as well :)
ReplyDeleteSo cute! I made some of these to wear to a Christmas party a few weeks back. Would love for you to come visit me at Sew Chatty and link up to Made with Love Monday. I host every week. I am leaving the party open longer this week so that people can link up multiple projects if they wish to. Hope to see you there! http://sewchatty.blogspot.com
ReplyDeletethese are so pretty and cute! thanks for linking up!I love your blog and your tutorials!
ReplyDeleteSo pretty! Thanks so much for linking up :)
ReplyDeletethese are super duper adorable!
ReplyDeletemy sister makes these with burlap.... they look very pretty, you should give that a try for a more rustic look.
Awesome job!!!!
CB