Monday, June 6, 2011

Flowers! Flowers! Flowers!

Wow...so it's been a while since I posted anything.  I've been busy and having done much crafting lately.  I started a new job and we've been working a lot in the yard lately, which has been a lot of fun but hasn't left much time for crafting.  Since I don't have any new crafts to share I thought I'd show off some pictures of all the pretty flowers we have around our house.  A big  thanks to Mama Jules for supplying our home with all of the lovely flowers!!! 

We have hanging baskets filled with petunias and vinca vine on either side of our carport.  We also have lime green pots with succulents on either side.


We put up a hay rack under one of our windows filled with more petunias.

We added two clay pots on either side of the gate into our back yard.

We planted more than that and I will add some more pictures soon!  I also thought I'd add a picture of our garden beds now that they have lots of plants growing in them!  I love our garden!


Saturday, May 14, 2011

Chalkboard Label Winner!!!

The winner of the chalkboard labels is....
 Kitty who said...
I blogged you again! We really should stop meeting this way ;) http://nekosknitting.blogspot.com/2011/05/freebie-friday_13.html
Congratulations Kitty!!!  Please shoot me an email with your mailing address (katie{dot}anne{dot}haller{at}gmail{dot}com) and I will get it over to Ginger!

Monday, May 9, 2011

Etsy Shop Now Open!

I finally got my Etsy shop set up!  Please stop by and take a look at my shop. Here are a few of the great items you can find:


As a special bonus to my fabulous readers, right now you can get 10% off!  Just use the coupon code: EyeSpyDIYOpen

Thank you to everyone who stops by Eye Spy DIY on etsy!

Friday, May 6, 2011

Chalkboard Label Giveaway from Ginger Snaps!!! {Closed}

Hey Everyone, we have a great giveaway today from Ginger at Ginger Snaps Crafts!  I'm so excited for one of you to win!!!
__________________________________________

Hi.  I'm Ginger
from over at  Ginger Snaps Crafts.
It's a place to share ideas I've found, &
inspire you to create along with me.
I'm a wife to one awesome guy &
a busy mom of
5 wild & crazy kiddos.
I love to blog, garden,
craft, organize
& most of all be with my family.
I "met" Katie through whoopdwhoop.
I swapped her for one of her
(Love it!)
Thank you so much, Katie,
for having me over on your blog today.
Spring is my favorite season!
One of the reasons is all
the spring cleaning going on.
Something about opening the windows & 
packing up all the winter clothes
just makes you feel good inside.
You know, once you've got
everything tidied up
& organized you're going to
need a way to label things!
I've got just the thing for you! :)
Up for grabs today is
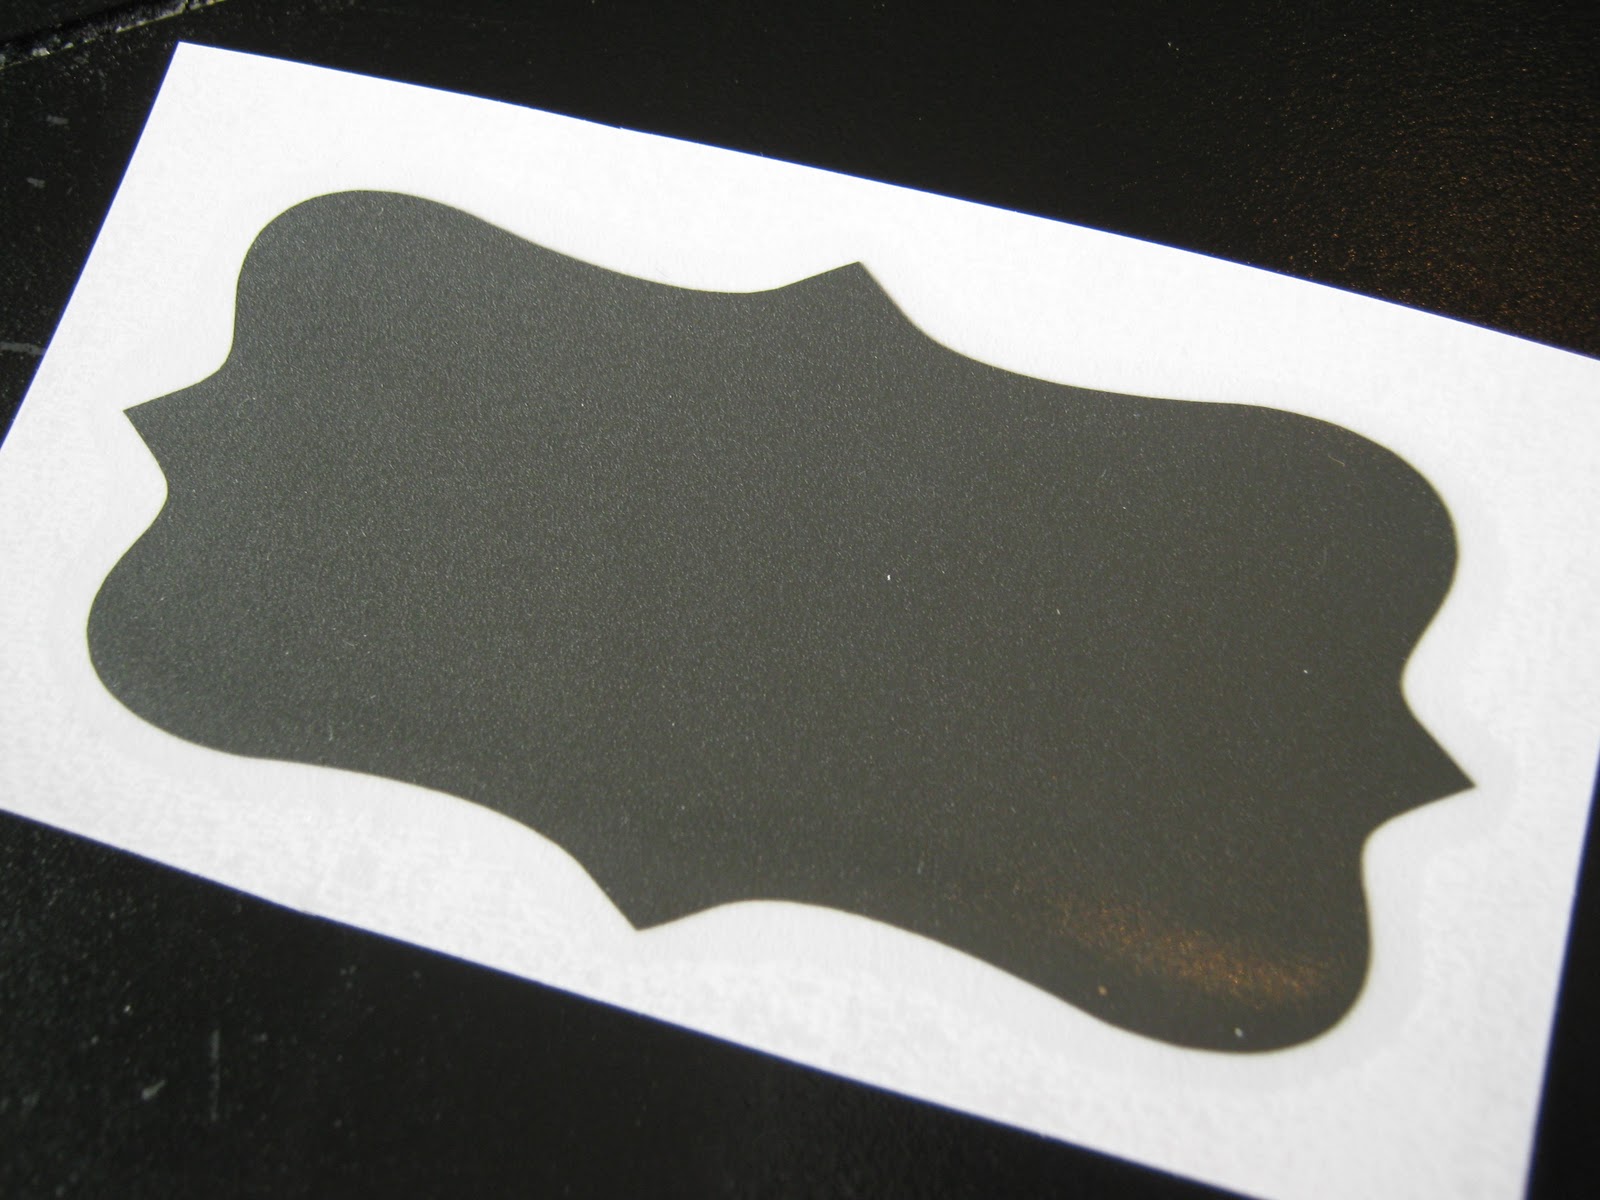
a set of 6 fancy rectangle chalkboard labels.
Use these for labeling:
toy bins, canisters,
storage bins, gift tags & jars
....just about anywhere in your
house that needs a little more organization. :)
You can use both regular chalk
or chalk markers on these labels.

Labels measure approximately
2 inches by 4 inches.
Chalkboard vinyl is a thick vinyl
with a sticky back. 
It can be wiped
off with a damp cloth,
& written on again & again.
Once applied though it
can not be repositioned.
The vinyl must be placed on a
clean, dry, smooth surface.
Ready to Get Organized?
{You must be a follower of Eye Spy DIY! to enter.}
To enter {mandatory}:
1. Go check out my blog, Ginger Snap Crafts,  become a follower & then come back here and tell me what you would use these labels for.
For extra entries {in seperate comments please!}:
2.  Visit my etsy shop, Ginger Snaps.  Heart my shop & then come back here telling me that you did.
3. Get an extra entry for adding my button for Ginger Snap Crafts to your blog .  (Look for it on the left hand side of my blog!) Then leave a comment telling me you did. :)
4. Blog about this giveaway on your blog! Leave a link in your comment. :)
Now for one more beautiful deal!
Use the code EYESPY for
10% off anything from my shop!
Good luck, everyone!
Thanks again, Katie!
{This giveaway will be open for one week.} 
______________________________________________

Thanks so much Ginger!  I am super lucky that Ginger sent me some of these labels to try out myself and I have to say that they are AMAZING!  Even better than I  could have imagined.  I love chalkboard stuff, but a lot of times when you erase them they leave chalk powder and never become fully clean again.  And I'll be honest, I never do anything perfect the first time so I know I will be wiping these labels off time and time again.  In fact, I didn't like my handwriting the first few times so already have wiped them off and redone them!  These wipe off so easy with a damp cloth and are perfectly clean, just like new.  I love them!  These were great to put on our coffee canisters.  We are a coffee loving household but my husband can never tell the difference between the different types of coffee.  He will put espresso in the coffee pot or coffee ground for the french press in the espresso maker since he can't tell which is which.  So these chalkboard labels were perfect for us! 

They come with easy to follow directions and are a fun addition to just about anything!  Make sure to enter this great giveaway and check out Ginger's etsy shop for more cute and amazing items she has created!

Thursday, April 28, 2011

Blog Swapping with Kassi at Truly Lovely

I'm so excited to be swapping blogs today with the wonderful Kassi from Truly Lovely!  Everyone make sure to check out Truly Lovely and all the great projects and posts she has on there.  Also make sure to stop by her blog every Friday and link up your projects to her Fancy This Fridays link parties!  

Now it is my great pleasure to introduce you to Kassi!
________________________________________________
 
Hello lovely Eye Spy DIY readers!!
I am so thrilled to be able to be here blog swapping with the lovely Katie today! If you're having Katie withdrawals... Which I'm sure you are...

You can visit her over on my blog today!!
She is this week's Bloggie Bestie over at Truly Lovely!!!
In the meantime... I'm Kassi from Truly Lovely!
Truly Lovely is a blog by myself and my sister Kayli about the things that we consider to be well... Truly Lovely!! :)

That's me! :)
You can read more about my sister and I 
AND our blog by clicking that lovely little button down there. :)

Truly Lovely


Today I would like to share a SUPER EASY tutorial with you!!
A fun fleece blanket!!


Photobucket

The materials needed are:
2 yards of fleece fabric
1 package of coordinating satin blanket binding
Coordinating yarn
Coordinating sewing thread
Pins
Yarn Needle
Scissors
Sewing Machine

Photobucket

In this case I went with zebra fabric and all red coordinating materials.

First trim your fleece fabric of any uneven edges or those funky white labeled edges... You know what I'm talking about... :)

Then, using the Yarn Needle, stitch your thread down the two length sides of your fabric like so... I spaced each stitch about a half an inch apart...


Photobucket


Next you'll pin and trim your satin binding to the two width sides (the two shorter sides)... The binding will have a fold down the middle, simply line that fold up with the edge of your fabric, making sure it's centered so there's an even amount of binding on both sides...


Photobucket


Fold over the edges of the binding to make your four corners and pin those as well. You can either trim or fold the extra binding inside to make your corner.


Photobucket


Once you have the binding pinned onto both sides, get out the sewing machine. I used red thread to match the binding...


If you sew really well, you can use a varying color of thread for added pop!!! I don't so much... SO matching thread hides my inexperienced sewing skills. :)
(I'm a little addicted to zebra print... can you tell?!?)


Photobucket


Simply sew the binding to the fleece pulling pins as you go.


And TaDA!!!! A SUPER EASY fleece blanket made by you!
They make great baby gifts, or gifts for friends or family!! :)


Photobucket


Hope you enjoyed my tutorial!!


We would love it if you would pop over to Truly Lovely to say hi!
AND if you like what you see we would LOVE a follow! :)
Hope to see you there!!


THANKS SO MUCH TO THE LOVELY 
MISS Katie of Eye Spy DIY
for blog swapping with us today!!!


Thanks so much Kassi for that great tutorial and for being my Bloggie Bestie! 

Make sure to go visit me today over at Truly Lovely!

Tuesday, April 26, 2011

Guest Posting over at Ginger Snaps

Hey everyone, I am guest posting today over at Ginger Snaps!  I'm so excited that Ginger asked me to guest post on her great blog!  Make sure to head on over to Ginger Snaps and check out my card wallet tutorial.

Also make sure to check out her great etsy shop!


Monday, April 25, 2011

Raised Garden Beds

Now that spring is coming we are very excited to start a garden!  We have the perfect place for it this year on the side of house.  It has basically been wasted space for the last year, so we decided to put it to use and plant our garden there.
We got some wood from a deck that my husband's parents had torn out the previous year and were able to make two 8 foot by 4 foot raised garden beds!  And when I say we made the raised beds, I mean my husband made them!  But I planted all the plants and seeds.
Right now we have a bunch of plants started: arugula, spinach, cilantro, parsley, peas, onions, radishes rosemary, chives, bok choy and carrots!  It will be a fun summer tending to our new garden!  We also have our spoon garden markers in there so we can remember where we planted all of our seeds.

This weekend we also put bark in the flower beds in our back yard.  It made them look so much better!  Here's a picture before we added bark.
Kind of boring looking before.  And here is what it looked like after we added the bark!
I think it looks so much better.  The holes there are where we started potato plants!  Here's another part of our yard with the bark.

Thursday, April 14, 2011

Just Something I Whipped Up!

I was in a jewelry making mood last night and whipped up some earrings.  I made some frosted green earrings.
As well as some springy orange and green one.
I also made a pair that were a little bit more understated, gray with a hint of red.
I think they turned out pretty cute!  Would you like to make one of these pairs of earrings your own?  Head on over to Whoopdwhoop where you can get your own pair of these earrings or many of my other creations including checkbook covers, zipper pouches, card wallets, and rosette bobby pins.  Whoopdwhoop is a great community of crafters trading what they have made!

If you would like to sign up for Whoopdwhoop click on the link below to register.

Wednesday, April 13, 2011

Upcycled Spoon Garden Markers

Spring weather finally came to Idaho a few weeks ago so my husband and I have been in planting/garden mode.  We just made some raised garden beds this weekend and planted our first seeds for our veggie garden!  I needed a way to tell where I had planted certain seeds so we decided to make garden markers out of old spoons.

What you will need:
  • Old Spoons (silver ones are easier to hammer out, but stainless steel ones work too, I had to get my hubby to stamp the stainless spoons)
  • Hammer and/or Sledgehammer (I found it easier to use the sledgehammer rather than a normal hammer to pound them flat)
  • Metal letter stamp set (my piece of advice, buy this at a hardware store, if you try finding it at craft stores they are ridiculously over priced, I got my set for $2.50 at Harbor Freight Tools, I saw them at craft stores for $30)
  • Sharpie
  • Hard surface to pound out your spoons (we used some rocks on our patio)
 Take your spoon, put it on a hard surface with the patterned side facing down and smash away with your sledgehammer, until it is flat.  Next get out your letter stamps and place the first letter where you would like it to go and strike it hard with your hammer.  Finish up the rest of your word like this.  It will come out looking something like this.
I found it a bit hard to read it like that so I wanted to fill in the letters.  This is where the sharpie comes in.  You will write over the lettering, pushing the sharpie down hard so it gets in the crevices. 
Next you will take a paper towel or rag and wipe off the sharpie that is not in the crevices.  Most of the sharpie will come off but you may need to get your paper towel/rag damp to get it all off.
You can put the lettering in different patterns; we put cilantro diagonally because it was a longer word.


Now all you have to do is put them in your garden!

    Friday, April 8, 2011

    Pillow Cover Tutorial Part 2 - Hidden zipper and Assembly

    This part of the tutorial will cover putting in your hidden zipper and assembling your pillow.  For part 1 of this tutorial, creating the piping, click here.

    What you will need:
    • The piping you made from part 1 of this tutorial
    • Fabric for the front of the pillow cut to one inch longer and wider than the pillow form (i.e. if your pillow is 12x18 cut your fabric to 13x19)
    • Fabric for the back of the pillow cut one inch wider than your pillow and 2 inches longer that your pillow (so for our 12x18 pillow we would cut the fabric to 14x19 since it will be a long skinny pillow)
    • Zipper
    • Pillow form
    • Sewing machine with regular and zipper feet
    • Scissors
    • Pins
    • Iron
    The first thing we want to do is attach the piping to the front piece of fabric.  You will want to pin the piping to the right side of the fabric and curve around the edges.  Where the beginning and end of the piping meet you will want to cross the two ends over each other.  I try to make this at the bottom of the pillow.
    (Here is where you do as I say and not as I do, and make sure to iron your fabric first!)
    Around the corners you will want to make slits in your fabric with your scissors so it will go around the curve smoothly.
    With your zipper foot on your machine stitch around the entire edge, making sure you are sewing right up against the piping.
    Set that piece aside for now as we're going to work on the back of the pillow now.  Take your back piece of fabric and cut it into two pieces (the direction the zipper will go) about 5 inches from the bottom of the fabric.  Place one piece of fabric on top of the other and center your zipper along the seam.  Mark with pins where the zipper ends (about an inch and a half  or two from each end preferably).
    Set your zipper aside for now.  Put your regular sewing foot back on your machine.  Sew from one end up to the first pin and back-stitch both at the beginning and at the pin.  Now set your stitch length to it's longest setting and sew from the first pin to the second pin making sure not to back-stitch.  Once you get to the next pin, put your stitch length back to it's normal length and sew to the end back-stitching at the pin and at the end.  Iron open your seam.
    Place your zipper over the seam and pin in place, with zipper teeth sitting on top of seam.
    Put your zipper foot back on your machine and sew a rectangle around your zipper.
    Turn it over and it will look like this.


    Now taking either scisssors or a seam ripper either cut or rip the seam open that is over the zipper.  It will then look like this.
    Open your zipper all the way up (this step is important otherwise you wouldn't be able to turn the pillow right side out).  Put your front and back pieces of fabric right sides together and sew around the entire thing, making sure you are still sewing up against the piping.  Turn it right side out.
    Here is what the back looks like.
    Put your pillow form into the pillow and zip close and you're done!  I would love to see how your pillows turn out!