Thursday, April 28, 2011

Blog Swapping with Kassi at Truly Lovely

I'm so excited to be swapping blogs today with the wonderful Kassi from Truly Lovely!  Everyone make sure to check out Truly Lovely and all the great projects and posts she has on there.  Also make sure to stop by her blog every Friday and link up your projects to her Fancy This Fridays link parties!  

Now it is my great pleasure to introduce you to Kassi!
________________________________________________
 
Hello lovely Eye Spy DIY readers!!
I am so thrilled to be able to be here blog swapping with the lovely Katie today! If you're having Katie withdrawals... Which I'm sure you are...

You can visit her over on my blog today!!
She is this week's Bloggie Bestie over at Truly Lovely!!!
In the meantime... I'm Kassi from Truly Lovely!
Truly Lovely is a blog by myself and my sister Kayli about the things that we consider to be well... Truly Lovely!! :)

That's me! :)
You can read more about my sister and I 
AND our blog by clicking that lovely little button down there. :)

Truly Lovely


Today I would like to share a SUPER EASY tutorial with you!!
A fun fleece blanket!!


Photobucket

The materials needed are:
2 yards of fleece fabric
1 package of coordinating satin blanket binding
Coordinating yarn
Coordinating sewing thread
Pins
Yarn Needle
Scissors
Sewing Machine

Photobucket

In this case I went with zebra fabric and all red coordinating materials.

First trim your fleece fabric of any uneven edges or those funky white labeled edges... You know what I'm talking about... :)

Then, using the Yarn Needle, stitch your thread down the two length sides of your fabric like so... I spaced each stitch about a half an inch apart...


Photobucket


Next you'll pin and trim your satin binding to the two width sides (the two shorter sides)... The binding will have a fold down the middle, simply line that fold up with the edge of your fabric, making sure it's centered so there's an even amount of binding on both sides...


Photobucket


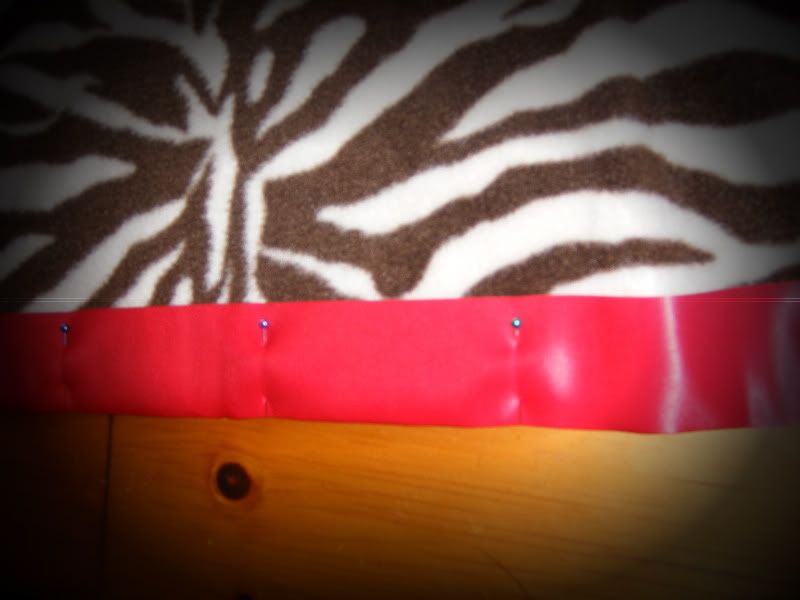
Fold over the edges of the binding to make your four corners and pin those as well. You can either trim or fold the extra binding inside to make your corner.


Photobucket


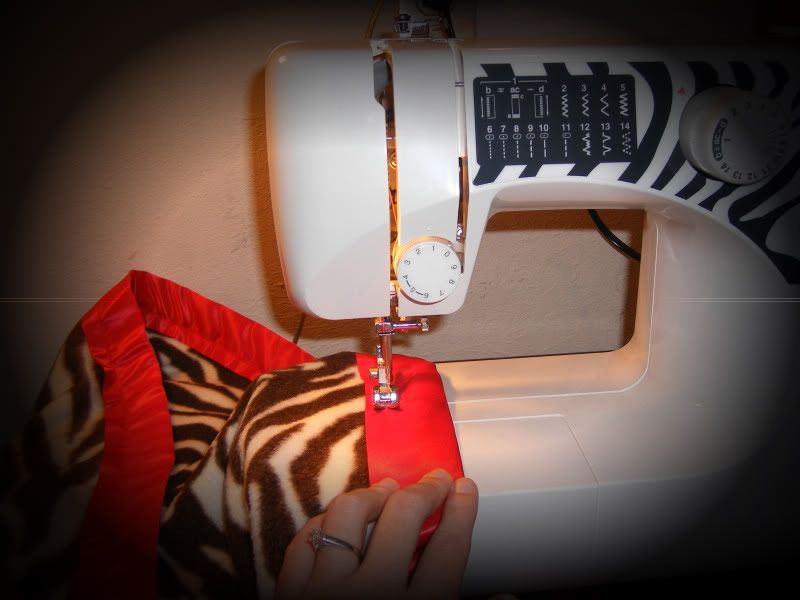
Once you have the binding pinned onto both sides, get out the sewing machine. I used red thread to match the binding...


If you sew really well, you can use a varying color of thread for added pop!!! I don't so much... SO matching thread hides my inexperienced sewing skills. :)
(I'm a little addicted to zebra print... can you tell?!?)


Photobucket


Simply sew the binding to the fleece pulling pins as you go.


And TaDA!!!! A SUPER EASY fleece blanket made by you!
They make great baby gifts, or gifts for friends or family!! :)


Photobucket


Hope you enjoyed my tutorial!!


We would love it if you would pop over to Truly Lovely to say hi!
AND if you like what you see we would LOVE a follow! :)
Hope to see you there!!


THANKS SO MUCH TO THE LOVELY 
MISS Katie of Eye Spy DIY
for blog swapping with us today!!!


Thanks so much Kassi for that great tutorial and for being my Bloggie Bestie! 

Make sure to go visit me today over at Truly Lovely!

Tuesday, April 26, 2011

Guest Posting over at Ginger Snaps

Hey everyone, I am guest posting today over at Ginger Snaps!  I'm so excited that Ginger asked me to guest post on her great blog!  Make sure to head on over to Ginger Snaps and check out my card wallet tutorial.

Also make sure to check out her great etsy shop!


Monday, April 25, 2011

Raised Garden Beds

Now that spring is coming we are very excited to start a garden!  We have the perfect place for it this year on the side of house.  It has basically been wasted space for the last year, so we decided to put it to use and plant our garden there.
We got some wood from a deck that my husband's parents had torn out the previous year and were able to make two 8 foot by 4 foot raised garden beds!  And when I say we made the raised beds, I mean my husband made them!  But I planted all the plants and seeds.
Right now we have a bunch of plants started: arugula, spinach, cilantro, parsley, peas, onions, radishes rosemary, chives, bok choy and carrots!  It will be a fun summer tending to our new garden!  We also have our spoon garden markers in there so we can remember where we planted all of our seeds.

This weekend we also put bark in the flower beds in our back yard.  It made them look so much better!  Here's a picture before we added bark.
Kind of boring looking before.  And here is what it looked like after we added the bark!
I think it looks so much better.  The holes there are where we started potato plants!  Here's another part of our yard with the bark.

Thursday, April 14, 2011

Just Something I Whipped Up!

I was in a jewelry making mood last night and whipped up some earrings.  I made some frosted green earrings.
As well as some springy orange and green one.
I also made a pair that were a little bit more understated, gray with a hint of red.
I think they turned out pretty cute!  Would you like to make one of these pairs of earrings your own?  Head on over to Whoopdwhoop where you can get your own pair of these earrings or many of my other creations including checkbook covers, zipper pouches, card wallets, and rosette bobby pins.  Whoopdwhoop is a great community of crafters trading what they have made!

If you would like to sign up for Whoopdwhoop click on the link below to register.

Wednesday, April 13, 2011

Upcycled Spoon Garden Markers

Spring weather finally came to Idaho a few weeks ago so my husband and I have been in planting/garden mode.  We just made some raised garden beds this weekend and planted our first seeds for our veggie garden!  I needed a way to tell where I had planted certain seeds so we decided to make garden markers out of old spoons.

What you will need:
  • Old Spoons (silver ones are easier to hammer out, but stainless steel ones work too, I had to get my hubby to stamp the stainless spoons)
  • Hammer and/or Sledgehammer (I found it easier to use the sledgehammer rather than a normal hammer to pound them flat)
  • Metal letter stamp set (my piece of advice, buy this at a hardware store, if you try finding it at craft stores they are ridiculously over priced, I got my set for $2.50 at Harbor Freight Tools, I saw them at craft stores for $30)
  • Sharpie
  • Hard surface to pound out your spoons (we used some rocks on our patio)
 Take your spoon, put it on a hard surface with the patterned side facing down and smash away with your sledgehammer, until it is flat.  Next get out your letter stamps and place the first letter where you would like it to go and strike it hard with your hammer.  Finish up the rest of your word like this.  It will come out looking something like this.
I found it a bit hard to read it like that so I wanted to fill in the letters.  This is where the sharpie comes in.  You will write over the lettering, pushing the sharpie down hard so it gets in the crevices. 
Next you will take a paper towel or rag and wipe off the sharpie that is not in the crevices.  Most of the sharpie will come off but you may need to get your paper towel/rag damp to get it all off.
You can put the lettering in different patterns; we put cilantro diagonally because it was a longer word.


Now all you have to do is put them in your garden!

    Friday, April 8, 2011

    Pillow Cover Tutorial Part 2 - Hidden zipper and Assembly

    This part of the tutorial will cover putting in your hidden zipper and assembling your pillow.  For part 1 of this tutorial, creating the piping, click here.

    What you will need:
    • The piping you made from part 1 of this tutorial
    • Fabric for the front of the pillow cut to one inch longer and wider than the pillow form (i.e. if your pillow is 12x18 cut your fabric to 13x19)
    • Fabric for the back of the pillow cut one inch wider than your pillow and 2 inches longer that your pillow (so for our 12x18 pillow we would cut the fabric to 14x19 since it will be a long skinny pillow)
    • Zipper
    • Pillow form
    • Sewing machine with regular and zipper feet
    • Scissors
    • Pins
    • Iron
    The first thing we want to do is attach the piping to the front piece of fabric.  You will want to pin the piping to the right side of the fabric and curve around the edges.  Where the beginning and end of the piping meet you will want to cross the two ends over each other.  I try to make this at the bottom of the pillow.
    (Here is where you do as I say and not as I do, and make sure to iron your fabric first!)
    Around the corners you will want to make slits in your fabric with your scissors so it will go around the curve smoothly.
    With your zipper foot on your machine stitch around the entire edge, making sure you are sewing right up against the piping.
    Set that piece aside for now as we're going to work on the back of the pillow now.  Take your back piece of fabric and cut it into two pieces (the direction the zipper will go) about 5 inches from the bottom of the fabric.  Place one piece of fabric on top of the other and center your zipper along the seam.  Mark with pins where the zipper ends (about an inch and a half  or two from each end preferably).
    Set your zipper aside for now.  Put your regular sewing foot back on your machine.  Sew from one end up to the first pin and back-stitch both at the beginning and at the pin.  Now set your stitch length to it's longest setting and sew from the first pin to the second pin making sure not to back-stitch.  Once you get to the next pin, put your stitch length back to it's normal length and sew to the end back-stitching at the pin and at the end.  Iron open your seam.
    Place your zipper over the seam and pin in place, with zipper teeth sitting on top of seam.
    Put your zipper foot back on your machine and sew a rectangle around your zipper.
    Turn it over and it will look like this.


    Now taking either scisssors or a seam ripper either cut or rip the seam open that is over the zipper.  It will then look like this.
    Open your zipper all the way up (this step is important otherwise you wouldn't be able to turn the pillow right side out).  Put your front and back pieces of fabric right sides together and sew around the entire thing, making sure you are still sewing up against the piping.  Turn it right side out.
    Here is what the back looks like.
    Put your pillow form into the pillow and zip close and you're done!  I would love to see how your pillows turn out!


    Tuesday, April 5, 2011

    Pillow Cover Tutorial Part 1-Piping

    This is part one of my pillow tutorial.  It will cover how to make your own piping!  First you will need to gather your materials.

    What you will need:
    • Fabric that you will make your piping out of
    • Cording (length should be the perimeter of your pillow fabric plus a few inches)
    • Sewing machine with zipper foot
    You will need to cut your fabric on the bias, which is just a fancy word for cutting it diagonally.  I made my strips one and a half inches wide.  If your cording is somewhere around a half inch this should work for you.  If you go bigger I would cut your fabric strips a little wider.
    You will need a bunch of these strips to cover your cording.  Sewing the fabric strips together is very easy.  Take two of your strips and place them one on top of the other at a right angle (if your fabric has a right and wrong side put right sides together).  Then sew diagonally across the strips.
    Trim the excess fabric from the corner and fold open.
    Sew enough fabric strips together to cover your cording.  Place your cording in the center of your fabric strips.  If your fabric has a right/wrong side place the cording on the wrong side.
    Fold your fabric over the cording.
    Next put your zipper foot on your sewing machine and sew right up against the edge of the cording.
    Sew all the way to the end and you have your cording done and ready to be added to your pillow!
    Stay tuned for part 2 of this tutorial where we will put in a hidden zipper and assemble our pillow with this cording!